What To Discard Tuesdays - Week 2
Click HERE for the original questions and more quizzes on Mahjong Tutorial.
*Translations of the original quizzes start below*
*M=Manzu/Character, P=Pinzu/Circles, S=Souzu/Bamboo*
*Note that the questions are random, and you may see the same ones periodically*
*Rules: Full Hanchan. 25000 Point Start and 30000 Return. Uma is 10-30
One Red 5 in Manzu, Pinzu and Souzu respectively.
Any other rule that needs to be considered will be mentioned in the quizzes*
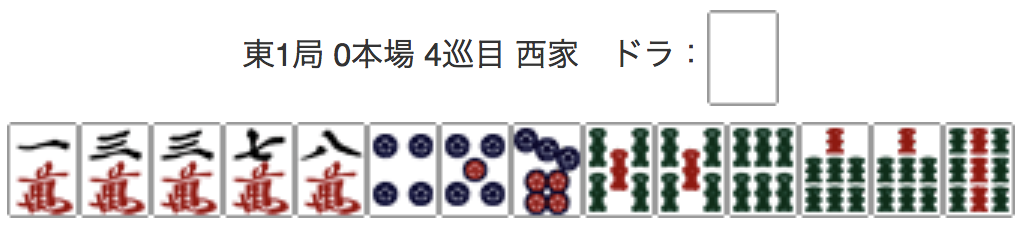
Q1.
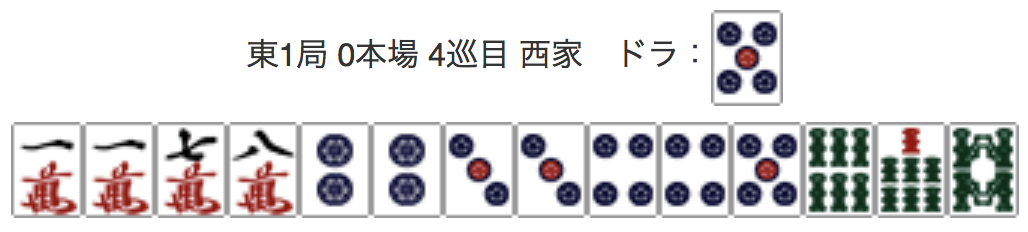
East 1, 0 Honba, 4th Turn, Seat Wind: West, Dora: 5P
A1.
2P is the correct answer. Although the final points will be the same regardless of discarding 2P or 5P, there is the risk that some one will call the Dora. If you have a choice, it will be better to discard the tile that is not the Dora.
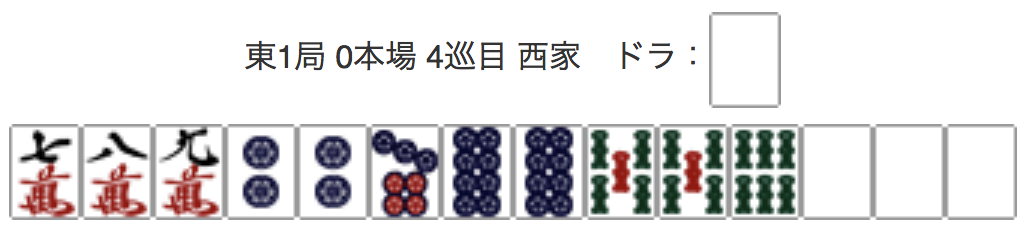
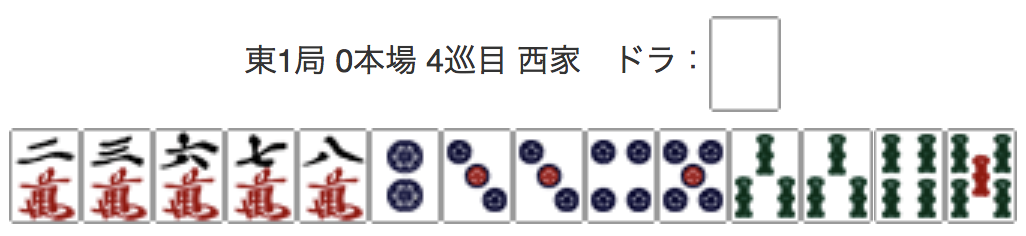
Q2.

East 1, 0 Honba, 4th Turn, Seat Wind: West, Dora: 3P
A2.
1S is the correct answer. This is because in the 1245S situation the 3S will overlap. Let's try and get rid of this situation sooner than later!
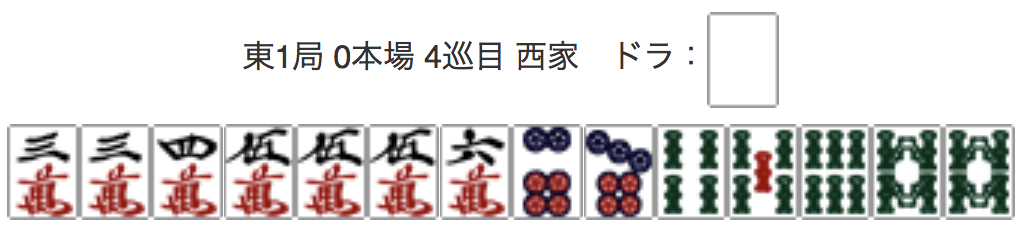
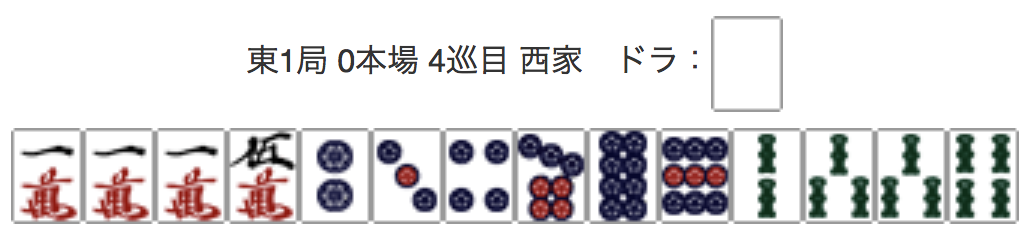
Q3.
East 1, 0 Honba, 4th Turn, Seat Wind: West, Dora: Haku
A3.
8P is the correct answer. This is by comparing the double sided waits. The double sided waits is stronger if they are towards the end of the spectrum, so discarding the 8P for the double sided wait is the correct answer.
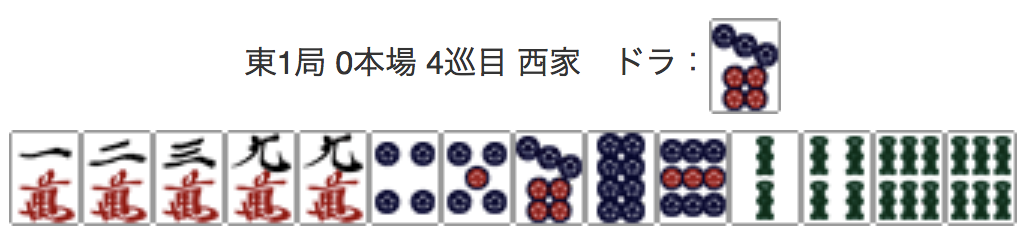
Q4.

East 1, 0 Honba, 4th Turn, Seat Wind: West, Dora: 2M
A4.
2S is the correct answer. Although discarding 6S will have the same amount of effective tiles that you can use, discarding the 2S will give you a higher chance of getting a better waiting shape. If your hand can aim for Pin-Fu, discard the 6S.
Q5.
East 1, 0 Honba, 4th Turn, Seat Wind: West, Dora: Haku
A5.
3M is the correct answer. Discarding the 3M has the most amount of effective tiles (22 tiles).
Q6.
East 1, 0 Honba, 4th Turn, Seat Wind: West, Dora: 7P
A6.
6S is the correct answer. Although the amount of effective tiles are the same as discarding 2S, you can also aim for Pin-Fu, so discarding 6S is the correct answer. If you can't aim for Pin-Fu, discard 2S for a possible better shape.
Q7.
East 1, 0 Honba, 4th Turn, Seat Wind: West, Dora: Haku
A7.
7P is the correct answer. Even if you discard 7P in a shape of 457P, there are no drawbacks, so 7P is the correct answer.
Q8.
East 1, 0 Honba, 4th Turn, Seat Wind: West, Dora: Haku
A8.
3S is the correct answer. Although you will loose your Atama/Pair and become "headless", this shape will allow your Pinzu/Circles to have a consecutive shape and will still have a good chance to get a Jan-Tou (Atama/Pair).
Q9.

East 1, 0 Honba, 4th Turn, Seat Wind: West, Dora: Haku
A9.
1S is the correct answer. Although you will be in 2 Shan-Ten (2 tiles away from Ten-Pai), Tan-Yao will become an option for you. Discarding 1S will still let you utilize 3S if you draw it.
Q10.
East 1, 0 Honba, 4th Turn, Seat Wind: West, Dora: Haku
A10.
5M is the correct answer. 2334S is a good shape, and since you can aim for Pin-Fu and Ii-Pei-Kou, discarding 5M is the correct answer.